There is a distinct category of food that I like to call “Emergency Joy.” It’s the kind of meal you pull out of your back pocket when the week has been long, the kids are starving, or the football game is about to start and you need a win. You don’t want a sink full of dishes, but you also refuse to compromise on flavor.
Enter the Easy Garlic Butter Cheeseburger Biscuit Bombs.
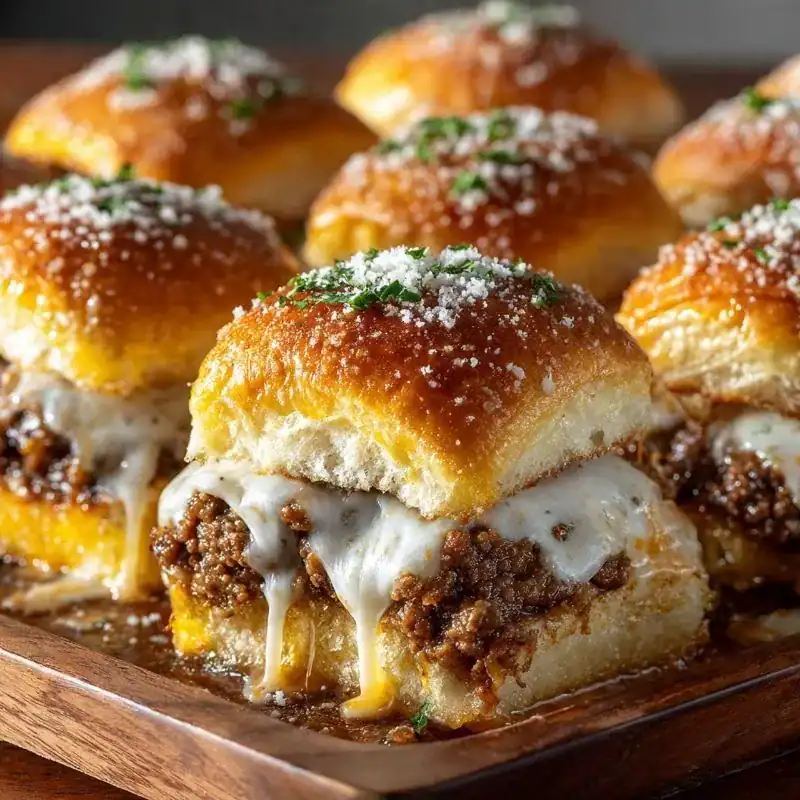
Imagine everything you love about a classic cheeseburger—the savory, caramelized beef, the sharp tang of cheddar, the aromatic hit of garlic—but stripped of the messy bun and encased in a warm, buttery, flaky biscuit blanket. When you pull one of these fresh from the oven, the steam rises, carrying the scent of parsley and garlic butter. You take a bite, and the exterior crunches slightly before giving way to a soft dough and a core of molten cheese.
This recipe is a masterclass in texture. It is a handheld comfort food that works just as well for a chaotic Tuesday night dinner as it does for a Super Bowl spread. It bridges the gap between appetizer and main course seamlessly.
If you find yourself obsessed with this specific flavor profile—that irresistible combination of savory beef and rich cheese—you absolutely must try our viral Menopause-Friendly Cheeseburger Alfredo Pasta for a sit-down dinner version that hits all the same notes but in a creamy, comforting bowl. But for tonight, let’s focus on the finger-food version that is about to become your family’s most requested recipe.

Easy Garlic Butter Cheeseburger Biscuit Bombs
Ingredients
Method
- Prepare the Beef
- Preheat oven to 375°F. In a skillet, brown ground beef with garlic, salt, and pepper until fully cooked (160°F internal). Drain grease thoroughly. Stir in Parmesan.
- Stuff the Biscuits
- Flatten each biscuit into a 5-inch round. Place a tablespoon of beef and one cube of cheddar in the center.
- Seal the Bombs
- Pull the edges of the dough up over the filling and pinch tightly to seal. Roll into a ball and place seam-side down on a parchment-lined baking sheet.
- Bake
- Bake for 15–20 minutes until golden brown.
- Garnish and Serve
- Mix melted butter with parsley. Brush over the hot biscuit bombs immediately after removing from the oven. Serve warm.
Why We Love These Easy Garlic Butter Cheeseburger Biscuit Bombs
In my twenty years as a food editor, I have seen thousands of “biscuit hacks.” Some are gimmicky, but some, like these Easy Garlic Butter Cheeseburger Biscuit Bombs, are genuinely brilliant. Here is why this recipe has earned a permanent spot in my “Pillar Content” rotation.
1. The “Flavor Bomb” Concept
The problem with a regular burger is distribution. Sometimes you get a bite of just bun, or the cheese slides off. With a biscuit bomb, the filling is sealed inside. The flavors effectively steam together inside the dough pocket. The beef juices infuse the inner layer of the biscuit, while the cheese melts into the crevices of the meat. It is a contained explosion of flavor, hence the name “Bomb.”
2. The Convenience Factor
We are using a “Grand” style refrigerated biscuit dough here. While I am usually an advocate for scratch-made dough, the structural integrity of the pressurized can dough is actually superior for this specific application. It stretches without tearing and puffs up beautifully to create that golden dome.
3. Portion Control and Scalability
You can easily make eight of these for a family dinner, or double the batch to make sixteen for a party. They are self-contained portions, which makes serving a breeze. No slicing, no plating—just grab and go.
Choosing Ingredients for Easy Garlic Butter Cheeseburger Biscuit Bombs
To elevate this from a “snack” to a “gourmet experience,” you need to understand the science behind your ingredients. Simple ingredients require precise selection.
The Beef: Lean vs. Fat
I recommend using 85/15 or 80/20 ground beef. Fat carries flavor. Since we are sealing this meat inside a dough pocket, we want that richness. However, and this is crucial, you must drain the grease thoroughly after browning. If you leave the rendered fat in the pan and then spoon it into the biscuit, the bottom of your Easy Garlic Butter Cheeseburger Biscuit Bombs will become soggy and greasy. If you prefer to skip the draining step, you can opt for 90/10 lean beef, but you may need to add a touch more salt and pepper to compensate for the flavor loss.
The Cheese: Cubes vs. Shreds (CRITICAL SCIENCE)
This is the number one mistake home cooks make with stuffed breads. Do not use shredded cheese inside the bomb.
Why? Shredded cheese has a high surface area. When it melts, it tends to emulsify into the ground beef. While tasty, it disappears.
To get that “Instagram-worthy” cheese pull and a distinct pocket of molten lava, you must use block cheddar cut into 1/2-inch cubes. When a cube of cheese melts, it holds its viscosity longer in the center, creating a gooey core that oozes out when bitten. It provides a textural contrast to the crumbly beef.
The Dough: Grand vs. Standard
Stick to the “Grand” size biscuits, specifically the “Flaky Layers” or “Butter Tastin'” varieties. The standard small biscuits are too thin to stretch around the filling without tearing. You need the extra volume of the large biscuits to hold a hearty tablespoon of meat and a chunk of cheese.
The Garlic Butter Finish
The filling is savory, but the crust needs love too. We finish these with a wash of melted butter mixed with garlic powder (or fresh minced garlic) and parsley. This mimics the flavor of garlic bread, adding a third dimension to the dish.
[IMAGE: Ingredients shot showing raw biscuit dough, cooked beef, cubed cheddar, and parsley | Alt Text: Ingredients for Easy Garlic Butter Cheeseburger Biscuit Bombs]
How to Make Easy Garlic Butter Cheeseburger Biscuit Bombs Step-by-Step
Follow these steps to ensure your bombs stay sealed and bake up golden brown.
Step 1: The Flavor Base
Preheat your oven to 375°F (190°C) and line a baking sheet with parchment paper.
In a large skillet over medium-high heat, brown 1 pound of ground beef. As it cooks, break it up into very small crumbles. We want fine crumbles so they fit inside the biscuit easily. Add your minced garlic, salt, and pepper. Cook until the beef is no longer pink.
Food Safety Note: According to the USDA Food Safety and Inspection Service, ground beef should always be cooked to a minimum internal temperature of 160°F (71°C) to ensure safety.
Step 2: The Stuffing Technique
Open your can of biscuits and separate them. Take one biscuit and gently peel it apart or flatten it with your hand until it is a round disk about 4-5 inches wide. Be careful not to make the center too thin.
Place a heaping tablespoon of the beef mixture into the center.
Press a cube of cheddar cheese firmly into the middle of the beef.
Step 3: The Pinch and Seal
This is the most important mechanical step. Pull the edges of the dough up and over the filling, gathering them at the top like a dumpling. Pinch the dough tightly together to seal.
Pro Tip: If the dough isn’t sticking, dab a tiny drop of water on the edges.
Roll the ball gently between your palms to smooth it out, then place it on the baking sheet seam-side down. This weight prevents the Easy Garlic Butter Cheeseburger Biscuit Bombs from popping open in the oven.
Step 4: The Bake and Brush
Bake for 15-20 minutes, or until the biscuits are a deep golden brown.
While they bake, melt 2 tablespoons of butter and mix in the chopped parsley and a pinch of garlic powder.
Immediately upon removing the pan from the oven, brush the tops generously with the garlic butter. Serve warm.
Best Dipping Sauces for Easy Garlic Butter Cheeseburger Biscuit Bombs
While these are delicious on their own, a dipping sauce takes them to the next level. Here are my top three recommendations to serve alongside your Easy Garlic Butter Cheeseburger Biscuit Bombs.
1. The Classic “Secret” Burger Sauce
This is non-negotiable for the true cheeseburger experience. Whisk together:
-
1/2 cup Mayonnaise
-
2 tbsp Ketchup
-
1 tbsp Sweet Pickle Relish
-
1 tsp White Vinegar
-
1/2 tsp Sugar
This tangy, creamy sauce cuts through the richness of the biscuit and mimics the flavor of a fast-food burger.
2. Roasted Garlic Aioli
For a more sophisticated, “gastropub” vibe, serve with a garlic aioli. The sharp garlic flavor complements the Parmesan inside the beef mixture.
3. Marinara Sauce (Pizza Style)
If you want to lean into the “Parmesan” aspect of the title, a warm cup of marinara turns these into a hybrid between a burger and a meatball sub. It’s a hit with kids.
What to Serve with Easy Garlic Butter Cheeseburger Biscuit Bombs
If you are serving these as the main course for dinner, you need to round out the plate with some nutrition to balance the carbs and dairy.
Because the bombs are rich and heavy, I highly recommend a vegetable side that brings natural sweetness and fiber. Our Roasted Sweet Potatoes for Menopause are the perfect pairing. The roasted sweetness contrasts beautifully with the savory garlic beef, creating a well-rounded nutritional profile.
Are you serving these as part of a larger “Game Day” spread? You need to mix hot and cold appetizers. These bombs are best served hot, so pair them with a cold, make-ahead option to save yourself stress. Our Easy Make-Ahead Pineapple Cranberry Cheese Log is the ideal candidate. The cool cream cheese and fruit offer a palate cleanser between bites of the savory burger bombs.
Storing and Reheating Your Easy Garlic Butter Cheeseburger Biscuit Bombs
One of the best features of this recipe is how well it stores.
Refrigeration:
Store leftovers in an airtight container in the fridge for up to 4 days.
Freezing:
You can freeze these Easy Garlic Butter Cheeseburger Biscuit Bombs after they are baked. Let them cool completely, then place them in a freezer-safe bag. They will last for up to 3 months.
Note: For best results with canned dough, I recommend baking them before freezing rather than freezing the raw dough, as the baking powder in the biscuits can lose its potency if frozen raw for too long. For more tips on handling refrigerated dough, you can check out the product pages on sites like Pillsbury, which offer specific handling guides for their Grand biscuits.
Reheating (The Air Fryer Trick):
Do not microwave these if you can help it! The microwave will turn the biscuit chewy and soggy.
Instead, use your Air Fryer. Reheat at 350°F for 3-4 minutes. This will re-crisp the outside of the biscuit while melting the cheese inside. If using an oven, reheat at 350°F for 10 minutes covered with foil.
FAQ: Troubleshooting Your Biscuit Bombs
Q: Can I use turkey instead of beef?
A: Absolutely. Ground turkey or chicken works well. Since poultry is leaner than beef, I recommend adding a tablespoon of olive oil to the skillet while cooking the meat to ensure the filling remains moist. You may also want to increase the garlic and seasoning, as turkey has a milder flavor.
Q: Why did my biscuits pop open while baking?
A: This usually happens for two reasons. First, you may have overfilled them. A heaping tablespoon is plenty; don’t get greedy! Second, the seal wasn’t tight enough. Make sure you pinch the dough aggressively and always place them seam-side down on the baking sheet.
Q: Can I make these in an Air Fryer?
A: Yes! Easy Garlic Butter Cheeseburger Biscuit Bombs are air-fryer friendly. Place them in the basket (not touching) and air fry at 330°F for 10-12 minutes. You have to lower the temperature compared to the oven because the fan forces hot air directly onto the dough, which can burn the outside before the beef is hot.
Q: Can I add bacon?
A: Is that even a question? Yes! Cooked, crumbled bacon added to the beef mixture is a phenomenal addition.